This guide provides a basic overview of how you insert content into a bundle in Word using the 'Insert...' commands on the Bundle-Maker ribbon. You can insert Word documents, PDF files, printed documents or pictures.
To insert content, click your cursor in your Word document bundle in the place where you wish the content to be inserted and then click the relevant 'Insert...' command. On each 'Insert ...' dialog, you have the choice to insert at the current position in the bundle or you can select to insert before or after the current item:
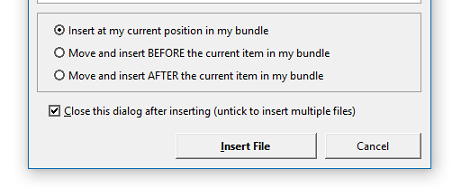
If you select to insert at the current position, you will need to make sure that this is either at the start or the end of another item, not in the middle of another item. The 'Move and insert BEFORE ...' and 'Move and insert AFTER ...' options will take care of this for you, ensuring you don't insert into the middle of another item.
To know where you are in a Word document so that you insert content in the correct place, a useful tip is to use Word's Navigation Pane (in Word 2010 and newer) or Document Map (in Word 2007 and older) to navigate in your bundle and locate the position where you wish to insert your content.
You can access the Navigation Pane or Document Map from either the Bundle-Maker tab on the Word ribbon or Word's View tab. It shows a list of the headings in your document and you can simply click on a heading to go to that location in your document.

You will now be at the start of this item and you can then click one of the insert commands on the Bundle-Maker ribbon tab to insert your content before the current item.
For example, in the screenshot below, content will be inserted where you can see the red line on the right, so correctly between two items:

Though the items in the screenshot above are not divided by an empty paragraph or line break, the insert commands will add these as neccessary and ensure that the inserted item does not encroach on the existing items.