A very common requirement will be to add your own text and Word documents to a bundle. This page covers the following:
Adding your own text to a bundle
Adding pre-existing Word documents to your bundle
Adding your own text to a bundle
You add your own text to your bundle in Microsoft Word before running the Bundle-Maker.
The Bundle-Maker will put a page break before every item in Heading 1 style and add items in Heading 1 style to your bundle's table of contents. Therefore, if you want to add your own text to a bundle, you will need give the text a 'title' (i.e. what you want to appear in the table of contents) and format the title in Heading 1 style. You may wish to see the Microsoft Word help section for more detailed instructions on using heading styles.

To make an item Heading 1 style, simply select it and use the 'Styles' command on the Microsoft Word Home ribbon (you will also find a 'Styles' command on the Bundle-Maker ribbon or when you right click in a document). Set the style to Heading 1:

That is all you need to do to make sure the Bundle-Maker can find your title and treat it as a separate document.
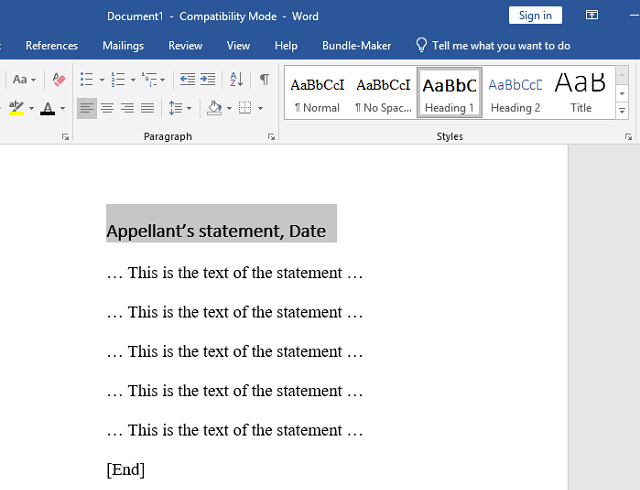
As the screenshot below shows, the title is now in Heading 1 style:
Obviously, if you are not working in your actual bundle document, you will need to copy and paste the text, complete with its heading, to your bundle. Make sure you insert the text immediately before or after another item within your bundle, not in the middle of another item (see the guide here if you need help with how to insert content).
Do note that Microsoft Word can sometimes change the font of a heading when you paste to a different document that already contains that heading style. The Bundle-Maker will take care of any formatting problems by giving every Heading 1 style a consistent font – and the Bundle-Maker 'Format Bundle' tab allows you to set the font yourself.
Important note: If incorrect or unwanted items appear in your bundle table of contents after running the 'Bundle-Maker', it will be due to the fact that those incorrect or unwanted items are in Heading 1 style. Therefore, you will need to make sure that apart from the titles/headings of individual items, Heading 1 style does not occur elsewhere in the document or text you add (e.g., use 'normal' style for the main text). Remember that you can easily undo your bundle, correct any styles and recreate your bundle.
Adding pre-existing Word documents to your bundle
The Bundle-Maker ribbon/menu gives you a quick and easy option to add pre-existing Word documents to your bundle.
Click your cursor in the place in the bundle where you wish to insert the Word document (see the guide here if you need help with how to insert content). Then click 'Insert Word Document' from the Bundle-Maker ribbon tab to open the insert dialog:

On the dialog, browse and select the Word document to insert. By default, the name of the file will be used as the title, but you can also type a title yourself (or edit the title as required). Note that the title you give the file will be what appears in the table of contents of your finished bundle.
Then click 'Insert Document'.
Note that you can select to replace any Heading 1 styles within the document you insert and this will happen by default (remember, any Heading 1 styles will otherwise appear within your bundle's table of contents). However, you can manually override this by un-ticking the box.
And note that if you un-tick 'Close this dialog after inserting' then you can insert multiple documents, one after the other, without having to reopen the dialog.